Our May “Tote-a-palooza” meeting* was all about constructing bags, specifically tote bags, with four guild members presenting on different aspects of bag making. We love learning from our own members – we’re grateful for their time and willingness to share their knowledge and experience!
*No, you didn’t read that wrong. I know May was many months prior, but we’re making an effort to catch up with these meeting recaps to share useful information and tools, and as a record of our programming. More to come!
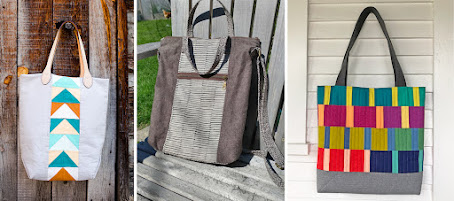
First, Amy Struckmeyer talked about the overall structure of a tote: outer shell + straps/handles (then options such as interfacing, lining, pockets, closures, and hardware). She then followed with some examples/inspiration, and instructions for making a simple bag.
For a tote that fits your needs, Amy suggested customizing a pattern or making your own. If you’re a beginner, you may want to follow a pattern with slight modifications based on your preferences/needs.
Things to consider when choosing or creating a tote pattern/design:
- Purpose: this can help you decide which substrate (fabric type) to use, and if a stabilizer/interfacing is necessary
- Proportion: How will you carry it? What do you want to carry in it?
- Appearance: Look at bags you already own – what do you like, what do you hate?
Amy’s basic [quilted patchwork] tote construction recommendations:
- Use a 1/2 inch seam allowance for durability.
- Match interfacing to substrate and intended use (ex. Pellon SF101 for quilting cotton).
- Add pockets, zippers, snaps etc. before sewing the whole thing together.
- Reinforce the straps if making your own, or use cotton or nylon webbing, or leather.
- Add extra height and width to account for boxed corners.
- Think about how the patterns of the front and back panels will match up when you join them together, and how close to the edge your focal image is – you don’t want to cut off points with that 1/2 inch seam.
- Make the front and back panels. Layer them on quilt batting (no need for a backing, but you can add interfacing if you want more body to your bag). Quilt as desired, then trim/square edges. Sew together to make outer bag shell.
- Make a lining of the same size. Use the same or a slightly larger (5/8 inch) seam allowance.
- Leave a gap (in the lining, or later at the top between outer shell and lining) for turning at the very end.
- Baste the handles to the outer shell before sewing lining to shell.
- Turn the lining inside out, place the shell inside (so right sides are together), then sew together along the top, reinforcing at the straps.
- Turn right side out using the gap, then stitch gap closed.
View a pdf version of Amy’s “Anatomy of a Tote Bag” slideshow for more detailed information and inspiration.
Second, Stephanie Socha presented different types of stabilizers and interfacing for bag making, as well as possible alternatives fabrics and creative substrates to use.
Stephanie’s suggested stabilizer/interfacing options:
- Fusible interfacing: medium-weight non-woven fusible, or 100% cotton woven fusible (such as Pellon SF101 Shape-Flex, or Bosal 300 Woven Fusible Interfacing) can be used on the lining or the outer shell fabric.
- Foam stabilizer: can be used on the exterior pieces to give structure. Products include ByAnnie’s Soft and Stable (100% polyester foam – better than polyurethane for durability – available in white or black); Pellon Flex-Foam F77 (polyurethane foam – make sure you get the kind that has knit fabric on the outside); and Bosal In-R-Form Sew In Foam Stabilizer.
- Extra firm non-woven interfacing: usually used for bag bottom panels. One product is Pellon Peltex 71F, which can be used in addition to foam stabilizer for extra durability. (Tip: cut this interfacing smaller to leave room for the seam allowance – don’t sew through the firm stabilizer.)
- Fusible fleece: gives soft structure to a bag. Thermolam Plus TP971F is a popular product.
She also discussed fun fabric alternatives for bag making: cork, faux leather, needlepoint panels, faux fur, repurposed textiles of all sorts, waxed canvas/linen/cotton, and more.
Find links to all of these resources and more in this reference document Stephanie shared with us.
Next, Emily Lang demonstrated two different methods for making boxed corners.
The square method: Start with a bag shell or lining (front and back panels) that has been sewn together and still inside out. Cut a square (typically 2” + seam allowance) from the sewn lines on both bottom corners. Then match the side seams (nesting them together) and sew that unsewn edge closed – this makes the box.
The triangle method: With the bag shell or lining inside out, nest the side seams together and, using a clear acrylic ruler, measure a determined length from the point (or some instructions say to locate a specific measurement across the triangle). Draw the line, sew along it, then trim the excess triangle off.
Other advice from Emily:
- YouTube is your friend! Search to find videos on how to make bags, pockets, zippers etc.
- Look for tutorials from the bag pattern author as well.
Finally, Sara Hockhauser showed us her method for making sturdy bag straps.
Sara’s method for a bag strap with a good weight – sturdy, but not bulky, once you sew the edges down:
- Start with a fabric piece that is four times the desired finished width of the strap.
- Cut two lengths of fusible fleece batting to slightly less than the finished strap width
- Fuse to both outer edges, turn to the middle and then fold again. This will create a strap with four layers of fabric, and two layers of batting.
- Edge stitch along both sides.
For a few of our favorite pattern designers and bags, pocket-making tutorials, and more, we’ve compiled this list of links and resources