Here we are, already at Month Two of the Big Fun Mystery Sew Along! Have you tried the curvy blocks from last month? This month features two more blocks, this time with a theme of “stripes” and a focus on strip piecing.
What is the Big Fun Mystery Sew Along? Check out last month’s post for an overview and more information. Most importantly, the idea is to have fun. Keep it simple or challenge yourself. Make one or both of the blocks introduced each month, or let them inspire you to create a variation of your own. Play with color and proportion. Let yourself enjoy the process without a firm plan. Share your work and be inspired by others.
Don’t forget to share your progress! Post photos of your blocks on Facebook or Instagram with the hashtags #chicagomqgsewalong and #BFMSAL.
MONTH 2 BLOCKS: STRIPES

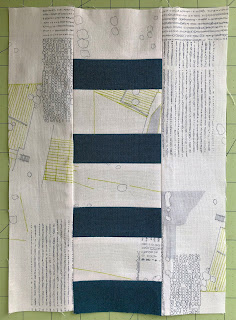
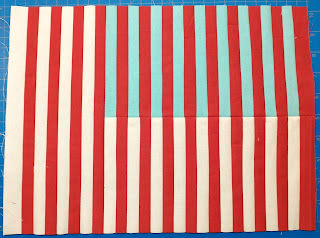
- This one is stripey. It will show you if your 1/4” seam is accurate, but it doesn’t matter because the block can finish at any size you desire. You may wish to make the stripes wider than I did — you can make them any width you’d like. I used three fabrics with the goal of producing a transparency or overlay effect. Pretend the white is the background, the red is the foreground, and the blue is in between.
- I used 1” strips for all my fabrics. They end up at 1/2” and have half the fabric in the seam allowances. There are several options for pressing the seams; experiment to see what works for you. There are other ways to piece this as well, but I wanted the blue to have a straight edge for the illusion.
- You could make several blocks to create an illusion between them with a blue block “between” the red and white “layers”. This block is a good practice piece to show how accurate your 1/4” seam really is. If you follow the pattern, each pair of strips should measure 1”, and the whole block should be 13-1/2” wide. Mine was wider, telling me that my 1/4” seam is too scant. You can see the spaces (third photo below) showing the red under the white and the blue under the red. It could also be that my 1” strips were cut a bit wide. Or that my fabric edges were not perfectly lined up when I sewed the seams. The main takeaway is that it doesn’t matter, the block can be whatever size you want.
Quilter’s Flag cutting instructions:
From white: Cut (4) 1” strips by the width of fabric (WOF)
From red: Cut (7) 1″ strips by WOF
From blue: Cut (3) 1” strips by WOF
Quilter’s Flag piecing instructions:
MAKE THE BLOCK:
1. Sew a red strip to a white strip along the long edges. Make three more. Sew the remaining red strips to the blue strips the same way. Press all strips, taking care to keep them straight. Bill pressed the red/white strips to the red and the blue/red to the blue.
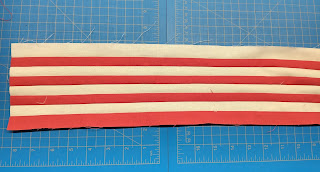
2. Sew the pieced red/white strips together to make a wider strip set, press the seams to the same color. Do the same with the blue/red strips.
3. Take the blue/red strip set and cut across the seams to make (3) 6” wide blocks. Sew these together as before. You should have a blue/red panel about 6” x 9-1/2”, and some left over strip set to use elsewhere in the quilt. Trim to 5-1/2” wide.
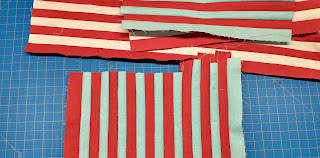
4. With the white/red strip set, cut across the seams to make (3) 6” wide blocks. Sew them together as before. Trim to 5-1/2” wide. Sew the 5-1/2″ wide white/red panel to the 5-1/2″ wide blue/red panel, aligning the red stripes. Bill pressed this seam open. (Yes, there is a bit of extra white/red panel, just unpick it and save for a rainy day.)
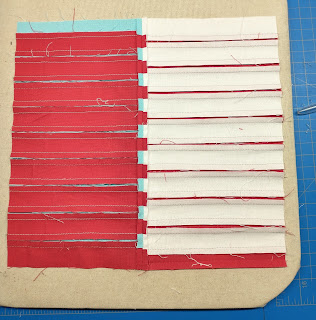
5. Cut the remaining red/white strip set to 11” and sew to one end of the joined blue/red/white panel, then trim to 10-1/2″ to complete the block. A bit of starch will help keep it flat.
- I wanted to name this block “Crosswalk”, but when I googled that I found another very similar block by the same name. So “Walk This Way” it is. I’ll just go ahead now and apologize for putting that song in your head. Or maybe that’s not entirely a bad thing?
- This block can be altered in so many different ways for so many different effects. Leave off one border (or both) and lengthen it by sewing many sections together to create a border block. Or make it asymmetrical by varying the widths of the two border strips. Maybe widen the center strips to create a more horizontal block. Or reverse the foreground and background hues. There are so many possibilities.
- Like the Quilter’s Flag block, this one is also a good one for checking the accuracy of your seam allowance. I ended up with a slightly longer than 10-1/2″ panel after sewing my strip sets together. My scant 1/4″ seam allowance is perhaps a little too scant. That’s why I’m suggesting that you cut 11″ long strips for the side borders — a half inch more than is needed if your seams are perfect. That way you have a little surplus in case you need it, and you can trim any extra.
MAKE THE BLOCK:
- Sew the 2″ wide cream strip to the teal strip along the long edges. Press seam, and then trim across the seam to make (4) 3-1/2″ wide strip sets. (You’ll have a little left over that you won’t need.)
- Sew the (4) 3-1/2″ wide strip sets together, to create the center 3-1/2″ x 10-1/2″ striped panel.
- Sew one 11″ strip to each side of the center panel, then trim as needed to square up the top and bottom of the block.