It’s Month Three of the Big Fun Mystery Sew Along and we’re making geese! Have you been sewing along? If not, feel free to jump in now and try out the flying geese techniques this month, or go back and make a block from Month One or Month Two.
What is the Big Fun Mystery Sew Along? Check out the first month’s post for an overview and more information. The most important part is that this should be fun, and we hope you’ll feel free to work at whatever pace you want. Keep it simple or challenge yourself. Make one or more of the blocks or techniques introduced each month, or let them inspire you to create variations of your own. Play with color and proportion. Let yourself enjoy the process without a firm plan. Share your work and be inspired by others.
Don’t forget to share your progress! Post photos of your blocks on Facebook or Instagram with the hashtags #chicagomqgsewalong and #BFMSAL.
MONTH 3 BLOCKS: FLYING GEESE
This month we’re focusing on technique, rather than specific blocks. You’ll find instructions here for making traditional pieced flying geese using two different methods (stitch-and-flip, and a no-waste four-at-a-time method), a how-to for improv flying geese, and patterns for foundation paper pieced geese (with tips for making your own FPP pattern). That’s four different flying geese techniques! Try one or more method, then use some geese to make a block for your mystery quilt. A row of flying geese would make a great border if your mystery quilt is going in the way of a medallion. Or just try out a new-to-you method and wait to decide how you might want to use it in your quilt.
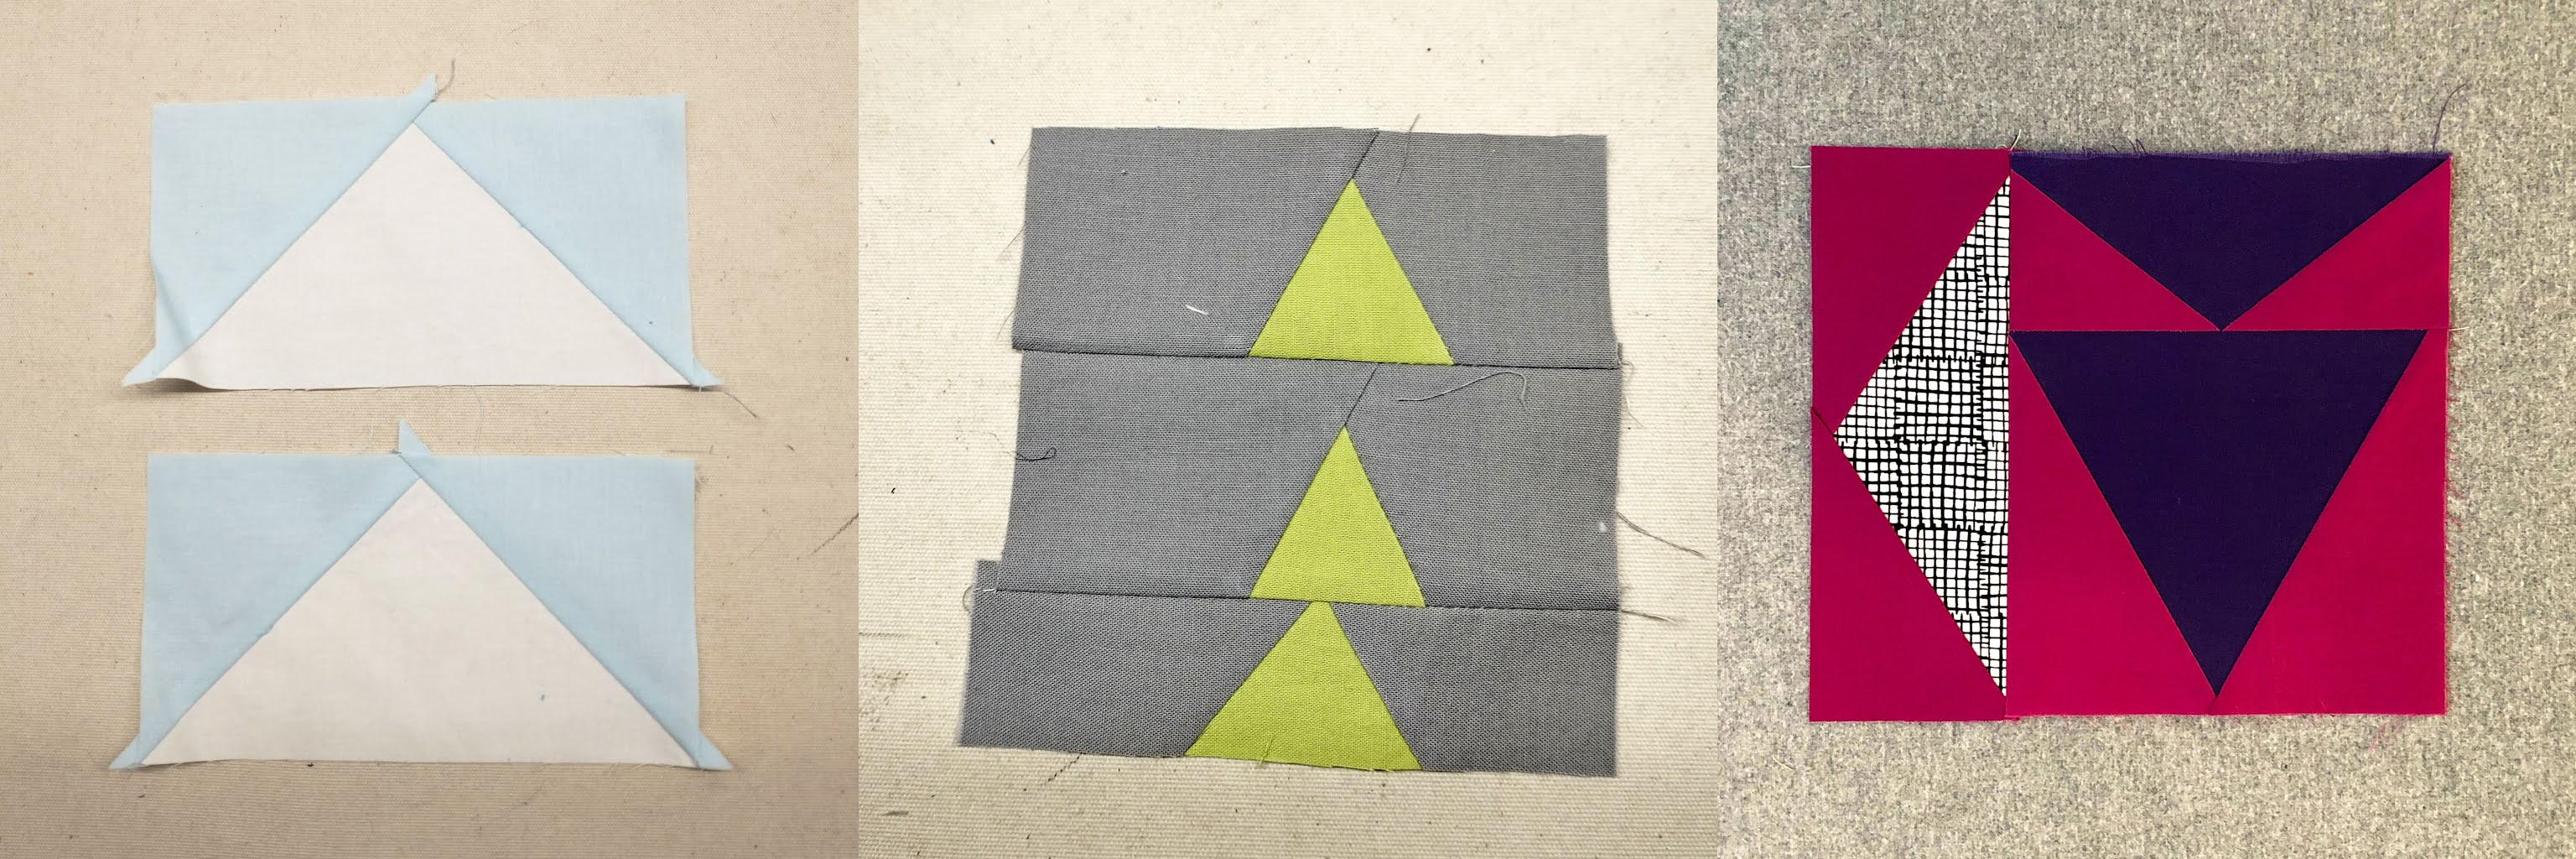
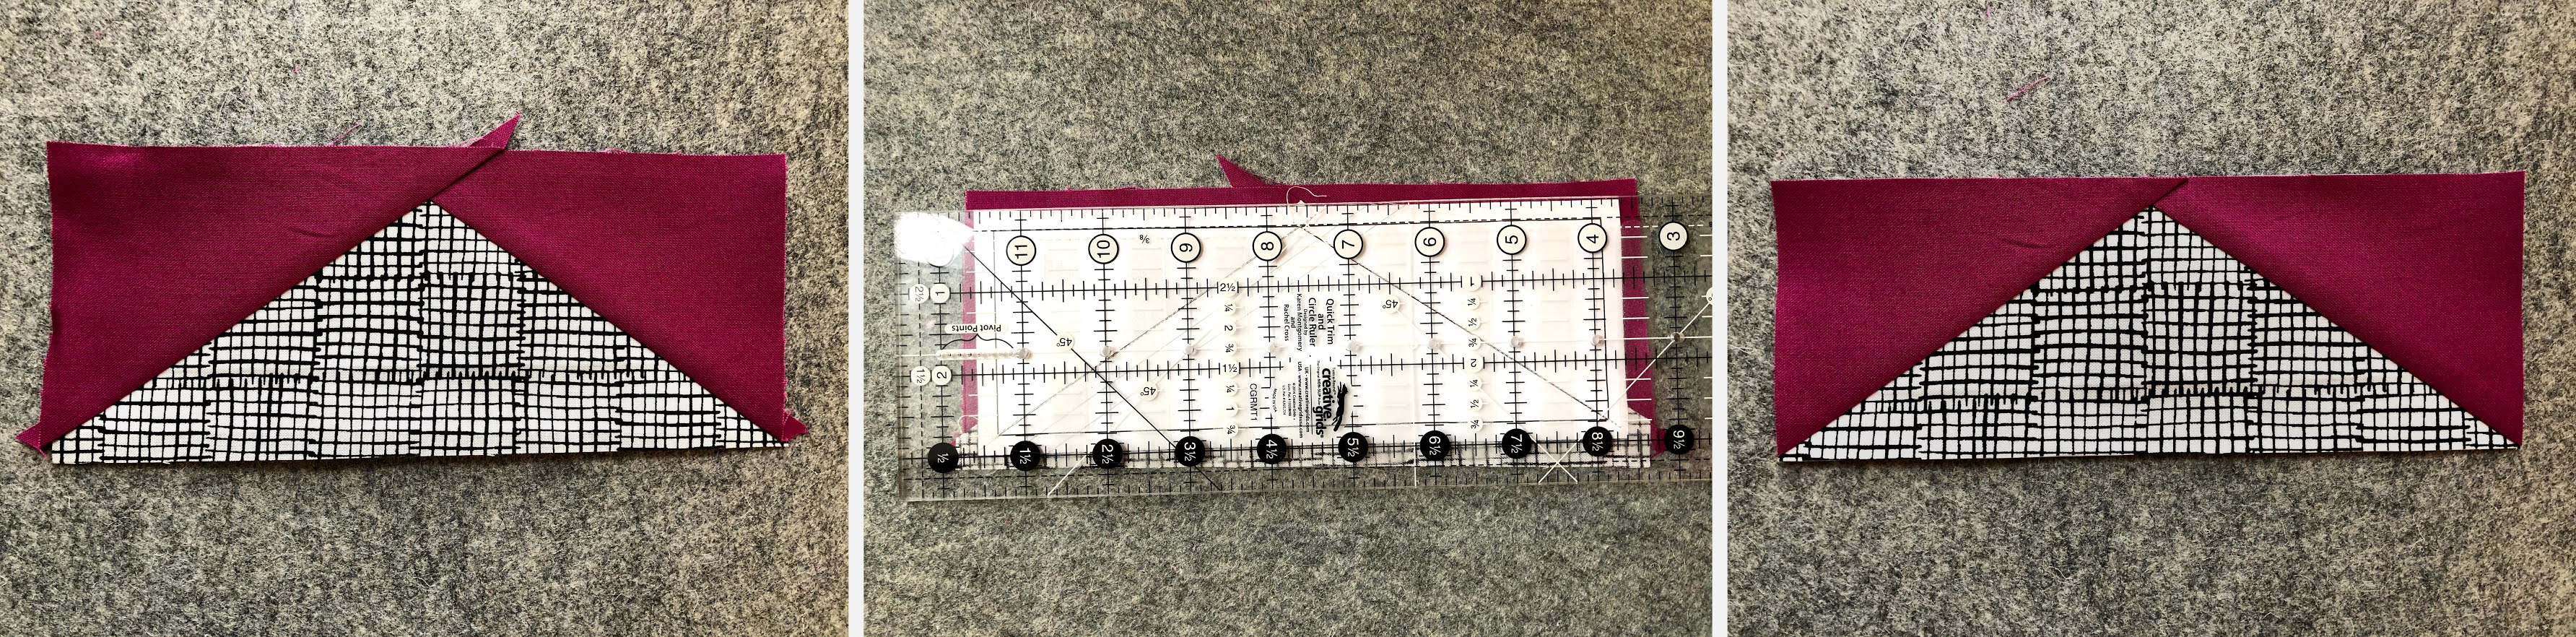
Traditional pieced flying geese (left), improv geese (middle), and foundation paper pieced geese (right)
Notes from Bill:
Below are a couple of ways to make flying geese, both traditional and improv. The simple stitch and flip method makes one at a time and leaves you with some “waste” triangles. I automatically sew these together and put them into my half square triangle (HST) bin — someday there will be enough for a full quilt. The second method creates four geese blocks with no waste triangles; this is good if you need a bunch of the same blocks and no HSTs. (This tutorial shows both methods, plus has a third traditional method to make flying geese one at a time, using three triangles — useful if you have a bunch of triangle scraps already.) Finally, the improv method creates some waste, but if you’re starting with scraps anyway, it’s a win-win.
Stitch and Flip Method:
This one at a time method uses a rectangle and two squares. The square determines the height of the finished block. The rectangle should be 2x the square dimension (minus 1/2”) in length, and the same height as the square. For example, with (2) 2.5″ squares, the rectangle should be 2.5” x 4.5”. This will give you a 2″x4″ finished flying goose. The squares are background, and the rectangle becomes the goose.
Draw a diagonal line across each square on the wrong side of the fabric. (fig.1)
Align one square with one end of the rectangle block, right sides together, and sew on the line. Trim 1/4” from the line. These cutoff, extra triangles can be sewn together to make a HST block. (fig.2)

Flip the background triangle out and press to reveal a partial goose. (fig.3)
Align the other square with the opposite end of the rectangle, right sides together, and sew on the line. Trim and press as before. You now have one flying goose and two HST blocks. (fig.4)

No Waste Method:
The no waste, four at a time method begins with (5) squares. There is a bit more math needed for the piece sizes, but you can simply reference the table in this tutorial. (Scroll down to the “four at a time method” chart.)
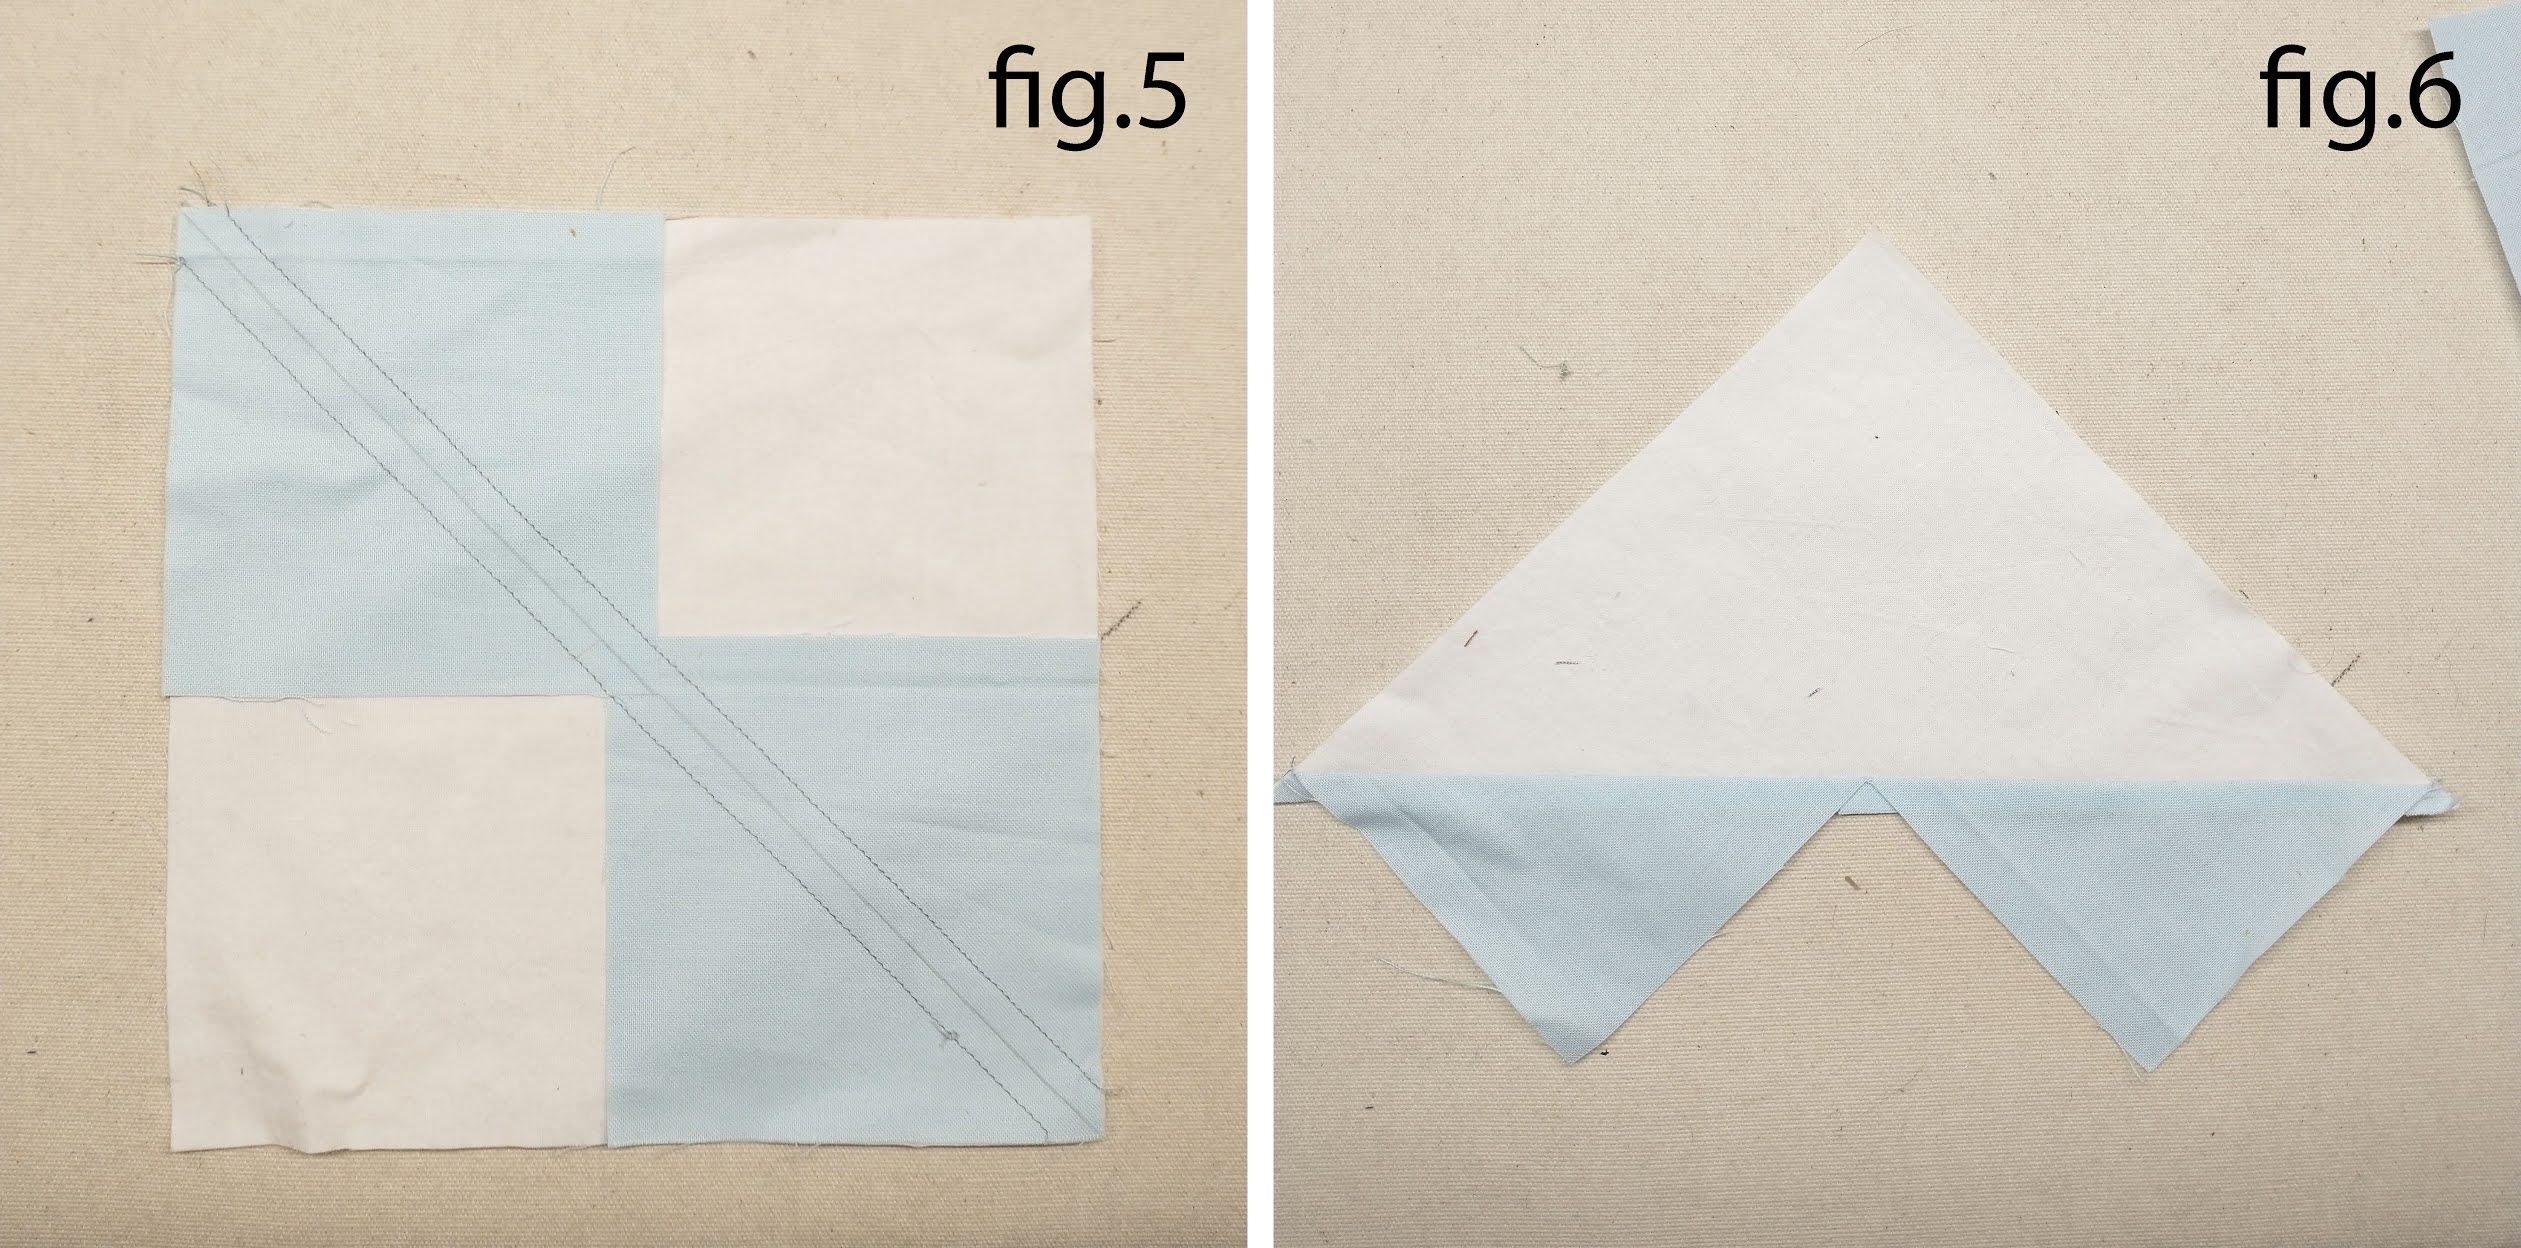
Take the larger square, which becomes the geese in the finished blocks, and lay two (2) of the smaller blocks on top from corner to opposite corner. Draw a line (or use a Hera marker to make a crease) diagonally from corner to corner. Sew a scant 1/4” from each side of the line. (fig.5)
Cut on the drawn line and press the half squares outward. (fig.6)
Take one of the other squares and place on the open corner of one partially finished piece as shown and draw a line like before. Sew a scant 1/4” on each side of that line and then cut on the drawn line. (fig.7)
Press the half triangles outward and you will have two flying geese blocks. (fig.8)

Repeat with the other partially complete block to complete two more flying geese for four total blocks and no waste.
Improv Method:
This is an easy improv method from one of Gwen Marston’s books.
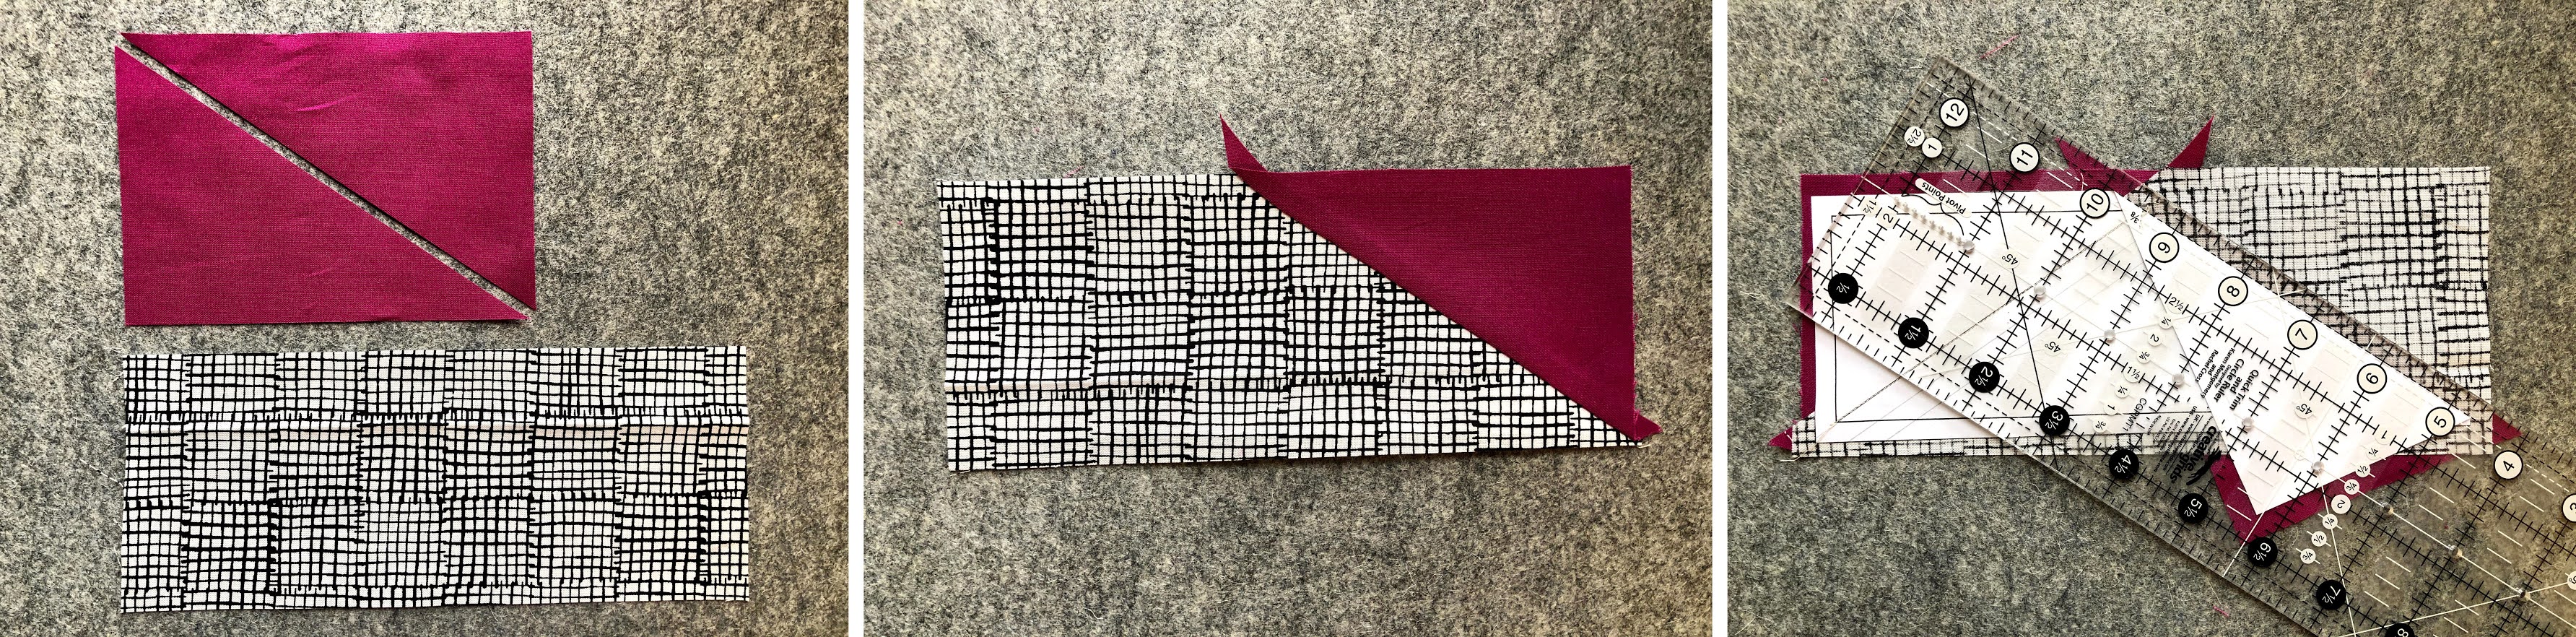
Take a strip of fabric for the background and a scrap of fabric for the goose — it can be a triangle or not. Lay the smaller scrap on top of the larger strip and make two angled slices, about 1/2” wider than your desired width for the goose (remember the seam allowances).
Sew the pieces together maintaining the arrangement of the pieces. Trim as desired.

Notes from Amy about foundation paper pieced flying geese:
If you want to make precision flying geese, particularly ones that are stretched or compressed (and not a typical 1:2 flying goose proportion), foundation paper piecing (FPP) might be the way to go. I’m providing three different sized FPP geese patterns, but you can very easily make your own in whatever size you want. It’s simple, really. First, using a straightedge and ruler, draw a rectangle that is your desired finished block size. For example, if you want a finished block size of 3″x8″, then draw a 3″x8″ rectangle. Then draw a diagonal line from the midpoint of one long edge to a corner on the opposite long edge, and a second line from the same midpoint to the opposite corner. This will be the shape and size of your finished flying goose. Finally draw a second rectangle that is 1/4″ larger than your first rectangle on all sides to add in the seam allowance — a clear quilt ruler is a great tool to use for this. That’s it! You will then have your own custom FPP flying goose pattern.
In terms of tools, you shouldn’t need anything other than what you already have on hand. A regular acrylic quilting ruler works fine for trimming, but if you happen to have an “add a quarter” ruler, that’s great. You can use special paper made for FPP, but regular printer paper works absolutely fine. In fact, I almost always use regular printer paper for FPP because it’s already in my printer and I don’t even have to think about it. A seam roller, like the one in the video linked below can make things go faster if you don’t want to press with an iron between each sewn seam, but, again, it’s not necessary.
Some people like to leave the paper when they’re sewing the blocks together to help hold the fabrics in place, other like to remove it before sewing blocks to each other. It really comes down to personal preference and, sometimes, the complexity of the blocks. I tend to remove the paper before sewing blocks together, although I’m very careful about trimming. Instead of trimming to the outside edge of the FPP pattern (which I often roughly cut with scissors), I line my ruler up a quarter of an inch from the finished block line to trim a precise quarter inch seam allowance.
FPP Flying Geese Method:
Print the FPP flying geese templates at full size – do not fit to page. Check for accuracy with the 1″ square on the template page. Then cut out the FPP template along the outer (dashed) line.
Cut a piece of fabric for the goose that is slightly bigger than the full rectangular pattern. I usually cut mine at least 1/4″ bigger in each direction. So for the 2.25″x6″ template, I cut a 2-1/2″x6-1/4″ rectangle. Use scraps or cut fabric for the background triangles as follows:
For 2.25″x6″ template: Cut (1) 3-3/4″x5-1/8″ rectangle, then cut in half on the diagonal.*
For 5.25″x6″ template: Cut (1) 4-1/2″x7-3/4″ rectangle, then cut in half on the diagonal.*
For 2.5″x7.5″ template: Cut (1) 4″x6″ rectangle, then cut in half on the diagonal.*
*This works only if you are using solids. If using prints, cut (2) of each size and do NOT cut on the diagonal.
If you haven’t foundation paper pieced before or need a refresher, here are some tutorials:
Reduce your stitch length to between 1.3 and 1.7, so your paper will perforate and tear away easily. Center the larger rectangle on the reverse side of the pattern, wrong side of fabric facing the paper, then align one smaller background piece as needed with the right sides of the fabrics facing each other. Pin, glue baste, or hold in place with your fingers. Refer to the tutorials above for more in depth directions for aligning, sewing, and trimming when foundation paper piecing. Turn over so the right side of the paper pattern is facing up (and fabric is below), then sew the first background triangle to the larger rectangle along one diagonal line. Trim and press. Repeat with the second background triangle.
Trim the flying goose block 1/4″ from the finished block line (or along the outer dashed line) to complete the block.
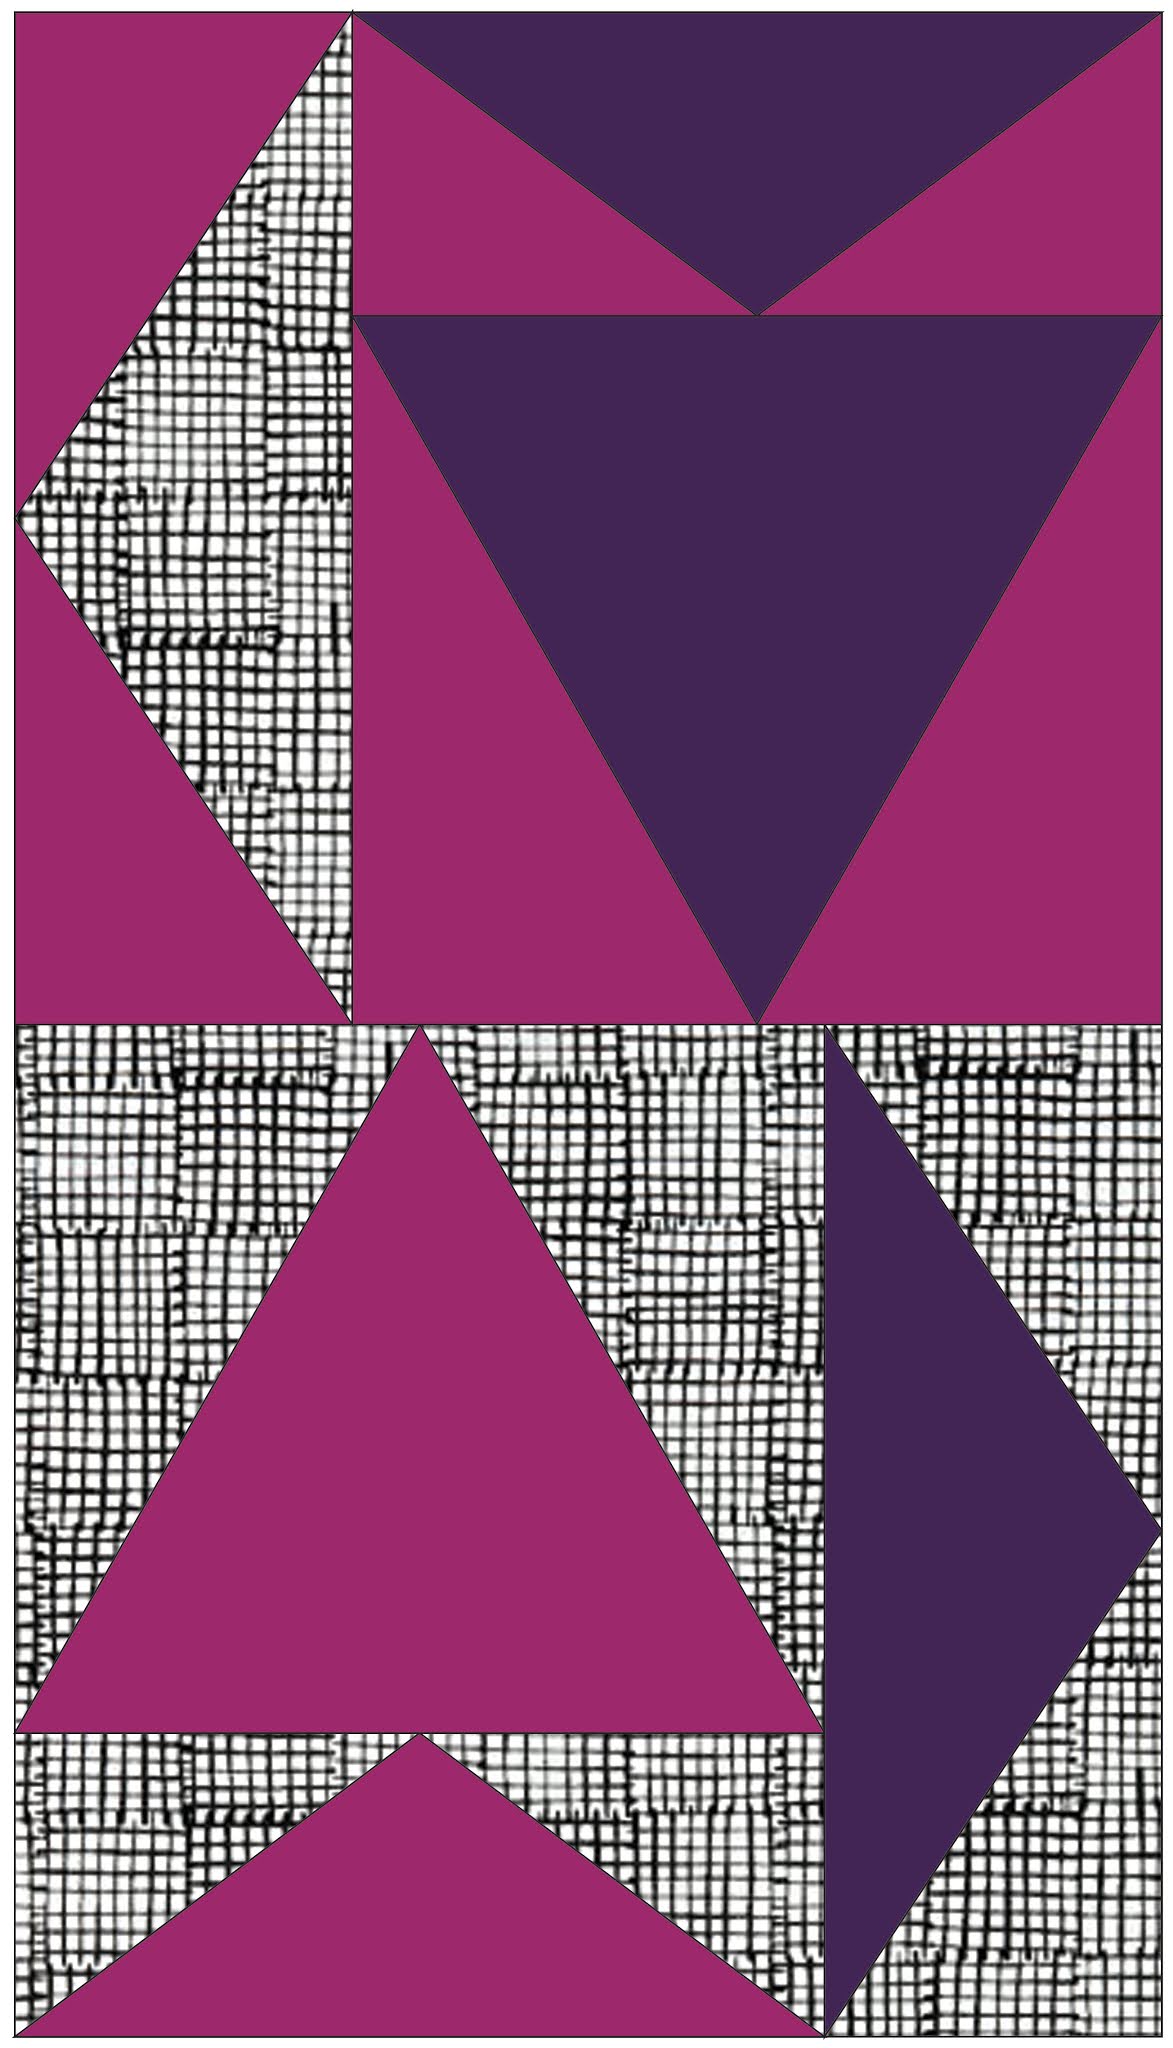
Below are just a couple of possible designs you could make with the foundation paper piecing templates provided. But feel free to arrange them in countless other ways — or create your own paper piecing patterns to make any shape or size of flying geese that you desire. Whatever you do, have fun!