It’s Month Four of the Big Fun Mystery Sew Along, and we’re getting into the holiday spirit and making “stars” this time. We’ve got two different blocks to share this month, one a little more challenging than the other, but both satisfying and, we hope, fun to make. The “wonky” improv star is quick to sew up and looks great in multiples (as anchoring corner blocks, or a row of tiny stars), with slight variations inherent to each one. The six-pointed star? Well, we just couldn’t resist celebrating this shape from the official flag of Chicago, our guild’s home town.
What is the Big Fun Mystery Sew Along? Check out the first month’s post for an overview of the challenge and instructions for that month’s curvy blocks. The most important part is that this should be enjoyable (and maybe a little challenging), and we hope you’ll feel free to work at whatever pace you want. Make one or more of the blocks or techniques introduced each month, or let them inspire you to create variations of your own. Play with color and proportion. Let yourself enjoy the process without a firm plan. Share your work and be inspired by others. Feel free to go back and check out the instructions from Month Two (stripes) or Month Three (flying geese) as well.
Don’t forget to share your progress! Post photos of your blocks on Facebook or Instagram with the hashtags #chicagomqgsewalong and #BFMSAL.
MONTH 4 BLOCKS: STARS
This month we’re back to featuring two different block patterns: a playful improvisationally pieced Wonky Star, and a precise foundation paper pieced Six-Pointed Star.

Notes from Bill:
Last month we covered flying geese and several ways to construct them. This improv star uses 4 wonky geese to create it. Improv blocks like this one are where quilters should start, there is no precision or point matching. Pick some fabric for the background and some scraps to use for the star itself. Start with 3” squares of fabric to make a 7.5” block. I used navy for the background and some white scraps for the stars.
Wonky Star cutting instructions:
From background fabric: Cut (8) 3” squares
From star fabric: Cut (1) 3″ square
Gather scraps (or a fat eighth) to cut as you go
Wonky Star piecing instructions:
MAKE THE BLOCK:
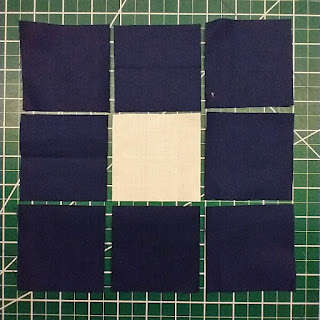
1. The blocks are constructed like a 9 patch. First lay out your squares, as shown below, to keep yourself straight.
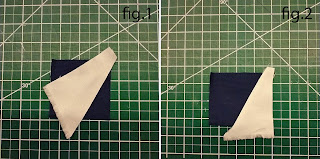
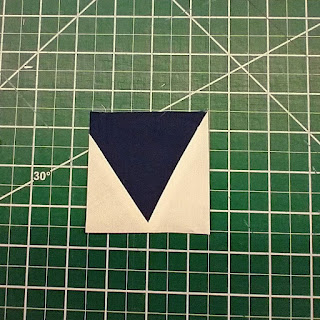
2. Sew a straight edged scrap on top of one of the background squares to create a star point, the background left visible (lower right) gives you an idea of the size of the star point. (fig. 1)
3. Trim off the background outside the seam allowance to reduce bulk. Open the star point and finger press the seam. (fig. 2)
4. Repeat Steps 2 and 3 with another scrap to make the opposite point. (fig. 3 & 4)
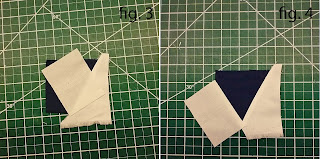
5. Press, then trim the block to 3” square. Then make three more using the same steps.
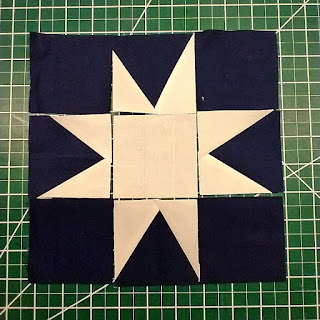
6. Arrange your four flying geese blocks, four corner backgrounds, and one center block as shown. Sew the squares together to create the 9 patch unit. Block will measure 8″ x 8″ unfinished.
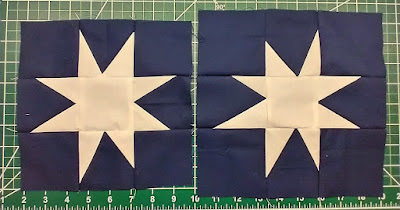
Variations: You can alter the size and proportion of the starting pieces to vary the look of the finished block. For the block on the right, I used rectangular backgrounds for the 4 geese blocks (3.5”x3”), 3.5” squares for the 4 background corners, and a 3” square for the center. This allows the points to be longer in proportion to the center and can also give an increased background “border” around the star.
Notes from Amy:
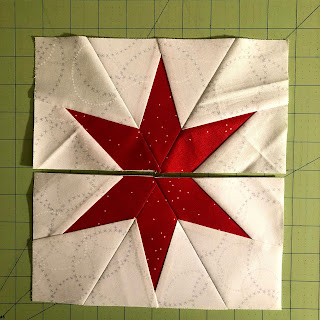
The Six-Pointed Star block is made up of six separate foundation paper pieced (FPP) sections that are then sewn together to create the finished block. Each of the six sections has a center “star” fabric with a background fabric sewn to each side. The way each section is constructed is very similar to the paper-pieced flying geese from last month, in fact, so keep that in mind if the pattern feels intimidating — it’s really made up of six relatively simple parts.
For this block, I recommend leaving the paper on when sewing the sections together. It helps to hold the fabrics in place so the inside corners of the star are more likely to match up.
I used red for the star (because Chicago flag!) and a subtle white print for the background.
If you haven’t foundation paper pieced before or need a refresher, here are some tutorials:
Foundation Paper Piecing Basics with Mister Domestic
Paper Piecing Made Simple with Angela Walters
Step by step foundation paper piecing tutorial by Faith Jones
Six-Pointed Star cutting instructions:
From star fabric: Cut (6) 2.5” x 5″ rectangles (A1, B1, C1)
From background fabric: Cut (8) 3.5″ x 4.5″ rectangles (A2, A3, B2, C2)
Cut (4) 3.5″ x 5.25″ rectangles (B3, C3)
Six-Pointed Star piecing instructions:
MAKE THE STAR POINT SECTIONS:
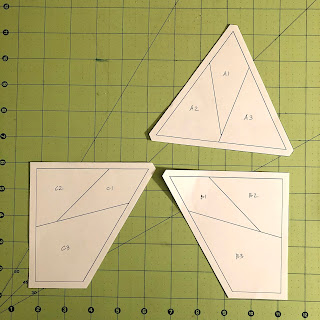
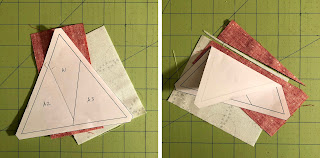
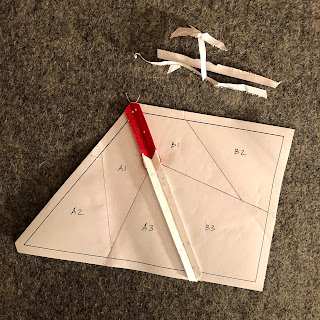
1. Print two copies of the Six-Pointed Star templates at full size – do not fit to page. Check for accuracy with the 1″ square on the template pages. Then cut out the FPP templates along the outer (dashed) line. You should have two of each template (A, B, and C).
2. Reduce your stitch length to between 1.3 and 1.7, so your paper will perforate and tear away easily. Center one Star fabric piece (2.5″ x 5″) on the reverse side of the pattern, wrong side of fabric facing the paper. Then align one small background piece (3.5″ x 4.5″) so that it extends into the A2 part of the pattern by roughly 1/4″, and with the right sides of the fabrics facing each other. Pin, glue baste, or hold in place with your fingers.
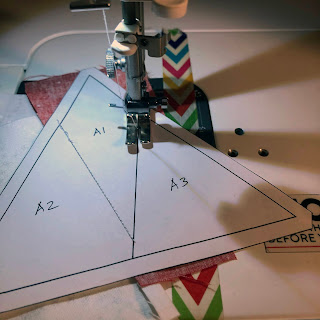
3. Turn over so the right side of the paper pattern is facing up (and fabric is below), then sew along the line between section A1 and A2. Fold the paper back along the seam line and trim seam allowance to 1/4″. Then finger press seam open (or lightly press with a dry iron).
4. Place a second small background piece (3.5″ x 4.5″) so that it extends into the A3 part of the pattern by roughly 1/4″, and with the right sides of the fabrics facing each other. Pin, glue baste, or hold in place with your fingers.
5. Turn over so the right side of the paper pattern is facing up (and fabric is below), then sew along the line between section A1 and A3. Fold the paper back along the seam line and trim seam allowance to 1/4″. Then finger press seam open (or lightly press with a hot dry iron).
6. Trim excess fabric as shown. Note: Instead of trimming to the outside edge of the FPP pattern (which I often roughly cut with scissors), I like to line my ruler up a quarter of an inch from the finished block line to trim a precise quarter inch seam allowance.
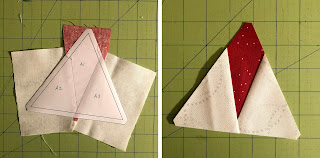
7. Repeat Steps 2 through 6 to make a second section with Template A and two each with Templates B and C. For sections B and C, use the larger (3.5″ x 5.25″) background fabric for the last piece sewn onto the paper (pieces B3 and C3).
COMPLETE THE BLOCK:
8. Lay out one of each sewn section as shown below. (Set the matching three sections aside.) Then sew section B to section A.
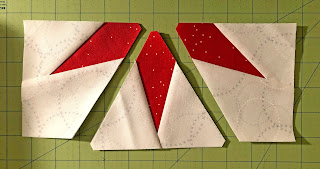
9. Press the seam open with a hot dry iron. I removed the paper from the seam allowance before pressing it open to get a flatter seam.
10. Sew section C to the other side of section A and press seam open as before.
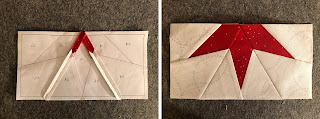
11. Repeat Steps 8 through 10 with the remaining three sections, then sew sew the two halves together to complete the block. Block measures 9″ x 9″ unfinished. The star should measure roughly 8″ from point to point.