Welcome to Month Five of the Big Fun Mystery Sew Along… and to a brand new calendar year (well, almost!). We hope you enjoyed making last month’s festive stars. This month we’re crossing 2020 off (Done! Finally.) with “X” and plus blocks. Ok, I just made that up — that wasn’t our intended plan — but it sounds good, right?!
Posting this a couple of days early (usually it’s the first of the month) since many of us are having a different winter holiday season than we normally experience. The upside to not traveling or hosting is, perhaps, more sewing? So, in case you have some extra time on your hands and want to get started, well, here you go. Cheers.
Month One: Curves
Month Two: Stripes
Month Three: Flying Geese
Month Four: Stars
Don’t forget to share your progress! Show your work and your process on Facebook or Instagram with the hashtags #chicagomqgsewalong and #BFMSAL.
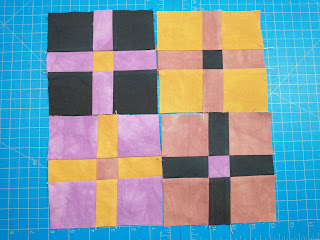
MONTH 5 BLOCKS: X’s and Pluses
This month we’re featuring an improv block that comes together a little like a magic trick, and a quick-to-sew, bright and scrappy block. Both of these allow for multiple variations and adaptations. We hope you’ll enjoy playing with the Improv Plus Sign and Scrappy X!

Notes from Bill:
The Improv Plus Sign blocks can be any size you desire. I’m showing them with a starting size of 6.5 inches square. They will finish approximately 1.5 inches smaller. This demo shows making them four at a time. I would make four to start and see if there are any lessons learned before you make the next four.
This block relies on contrast. Make sure there is contrast between the four fabrics you choose as they will come together with three fabrics to each block.
Improv Plus Sign cutting instructions (makes four):
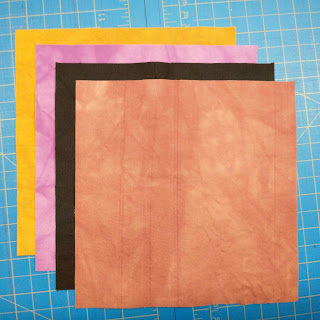
Cut (4) equal sized squares in four different colors (See note above about selecting contrasting colors; Bill started with 6.5″ squares.)
Improv Plus Sign piecing instructions:
MAKE THE BLOCKS:
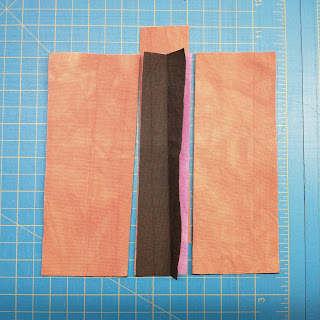
1. Change your rotary cutter blade if it’s been a while. Stack the fabrics and make two slices across the stack vertically. Make the slices roughly parallel and about 1.5” apart. The slices can be straight lines using a ruler or cut free hand. Slide the top stripe of fabric to the bottom of the pile.
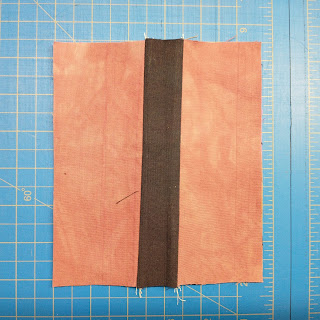
2. Starting with the top fabrics in each pile, sew each of the four blocks together. (Keep track of the order of the blocks/colors as you will need to restack them in next step.) Simply guide the edges together as you sew — no pins are needed. Use your standard 1/4” seam. DO NOT press after the first seam. Sew both seams before pressing the seam allowances inward.
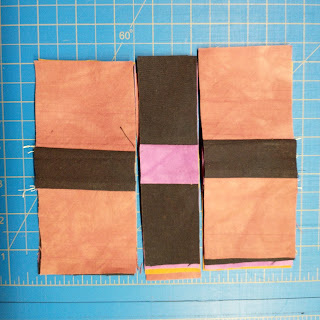
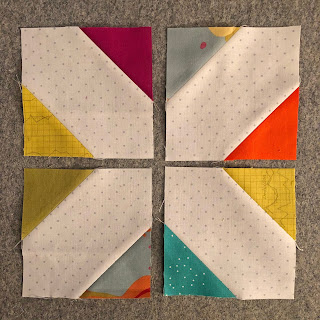
3. Stack the squares back in the original sequence, lining up the stripes running right to left, and cut a similar stripe in the vertical direction as before. Slide the top stripe to the bottom of the stack. Like magic, you should see a “+” in each layer, with a different colored square in the middle. If not, you didn’t restack them in the proper order.
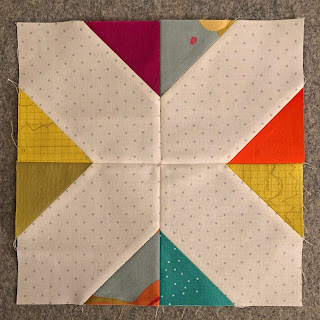
4. Sew the blocks together as before. I try to center the middle square with the four radiating stripes. Before sewing the stripe, I finger press the stripe’s seams outward so they will nest with the previously sewn/pressed seams. I press these last two seams outward so that the small square is all flat on the back side of the block. Give the blocks a good press, and then square them up as desired. Here you can see that the blocks with strong value contrasts are the most successful.
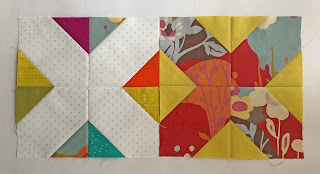
5. If desired, make another set of four blocks. You can use the same fabrics but shuffle the color order to create blocks with different color combinations. Or use four new fabrics.
Variations: You can also create two-colored blocks with the center square the same as the four corners by only using two fabrics. Experiment by making your cuts freehand (make sure to press only when both seams are sewn), making the stripes narrower or wider. If you want to make solid (one-colored) plus signs, you can make a single cut in your beginning square and insert a contrasting stripe, rotate 90 degrees, and then make another slice and insert the same colored fabric again.

Notes from Amy:
The Scrappy X is quick and easy — sort of an antithesis to last month’s paper-pieced star — and I love it’s graphic, punchy look. There are a few points to match up, but not many. I used one pin at those points/seams (and at the center seam) when sewing the sections of the blocks together. While the cutting directions below make an 8″ finished block, these would be adorable scaled down and repeated as a border. They could also be stunning as a giant super-sized “X”. And there’s no need to make them scrappy, if that’s not your thing. Scroll down for a version I made with just two fabrics.
Scrappy X cutting instructions:
From X fabric: Cut (4) 4.5” squares
From background fabric: Cut (8) 2.5″ squares
Note: for a scrappy version like the one above, use the same fabric/color for the larger squares, and an assortment of fabrics/colors for the smaller squares.
Scrappy X piecing instructions:
MAKE THE BLOCK:
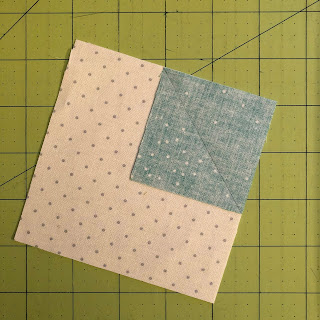
1. Lay a small square on top of a large square with right sides facing and two edges aligned as shown. Use a straight edge (such as your quilting ruler) to draw a diagonal line with pencil or a washable fabric marker from corner to corner of the small square.
2. Stitch along the drawn line. Trim 1/4″ from the seam as shown. Then press open.
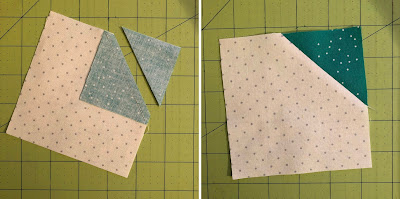
3. Repeat Steps 1 and 2 to add a triangle to the opposite corner, as shown.
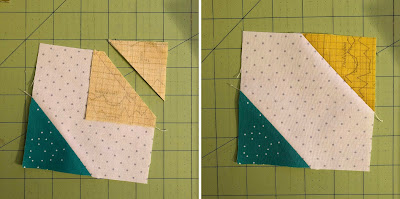
4. Repeat with the remaining three large squares and remaining six small squares of fabric to make three identical sections for the block.
5. Lay the sections out to create the X pattern. Sew the top two sections together, the bottom two sections together, and then sew the pieced top to the bottom to complete the block. Block measures 8-1/2″ square unfinished.
Variations: Make a two-color block by using one fabric for the larger squares and a second for the smaller squares. Here, I’m using smaller squares that are half the size of the larger squares, not including seam allowances: 4″ for the large squares (plus 1/2″ for the seam allowances); and 2″ for the smaller squares (plus 1/2″ for the seam allowances). You can easily scale the block up or down by using a little quilt math. For example, to make a 10″ finished block, you would need your large squares to be 5″ + 1/2″ = 5-1/2″ each, and your small squares to be 2-1/2″ + 1/2″ = 3″ each. Or play around with making the X wider or narrower by decreasing or increasing the size of your smaller squares compared to the larger sections.
Please reach out to Amy or Bill with any questions. We hope you enjoy making either (or both) of these blocks!